Orange Button Office
Every firestop project in one place.
Office turns a clashlist into a certified firestop design. Choose the manufacturers you work with, generate a tested penetration seal for every clash, and follow the work from quotation to an approved firestop on site, with or without a BIM model.
Solutions generated, you decide
For every clash Office finds the solution from your manufacturers that is approved for that situation, and shows why the others don’t fit.
With or without a model
Start from a clashlist out of BIM Online or Revit, or from PDF floor plans with the penetrations recorded on site.
Proof for your client
A report of every firestop in the building, and a read-only link for your client or the building owner.
The orange button
One click: a certified solution for every penetration.
Upload a clashlist and press Generate solutions. Office checks every clash against the Field of Application of the tested systems from your manufacturers, and proposes the one that fits.
- Matched on construction, fire rating, installation, insulation, opening and sizes
- Only the manufacturers you chose, your starred ones first
- No fit? See the near misses, with the property that ruled each one out in red
- You decide: pick another solution, and identical clashes follow
Video tour · Office
From clashlist to approved firestop.
Fourteen short videos: set up your company and manufacturers, generate certified solutions, and follow the work on site through to the report.
01Introducing Orange Button Office
Read the transcript
01 Introducing Orange Button Office
Welcome to Orange Button Office. A firestop is only certified when it is installed exactly as its approval says. Office finds the solution that fits each penetration.
The firestop is the last trade on site, after the main contractor, the installer and the drywall specialist. So it has to be fast, and right first time. Even better: with good engineering you are involved earlier, in the design phase.
The dashboard shows at a glance how your projects are doing.
Under Projects you find all your projects, each in its own phase.
Open a project and you see its clashlist. For every penetration it shows which certified solution goes with it.
Solutions and Components hold the products of the manufacturers you work with.
And then Field activities. This is where the work from site comes in, until it's approved.
In the next videos we look at the settings and get Office ready to use.
02 The dashboard and finding your way
After you sign in you land on the dashboard. At the top you first see your projects. Next to them is today's activity. Then your preferred solutions. And here you see how much of your licence you've used.
Below are your recent projects. The strip above them counts your projects per phase: checklist, quotation, engineering, construction and maintenance.
On the right is your company, with its users. Below it are your preferred manufacturers.
At the top of the screen, the bar shows how many clashes your licence has left. The bell shows new notifications.
And on the left is the menu. Hover over an icon to see its name.
Click Projects in the menu. Here all your projects are in one list, with their number, phase, city and how many clashlists they have. Click a phase to see only those projects. And click a project to open it.
In the next video you set up your company and your account.
03 Your company: settings and users
Before your first project, check your settings.
Under Personal settings you choose your language. You also choose which columns you see in a clashlist.
2FA protects your account. Keep your recovery codes somewhere safe.
The company settings decide which solutions Office can offer you. That depends on the countries you work in. And on the technical standards you use, such as European Technical Approval.
Here you also set the language of your reports. And you decide what viewers of a project are allowed to see.
On the right, Employees lists everyone in your company, with their role.
Under Users you invite your colleagues.
Click Invite new user and fill in your colleague's name and email address. They get an email to set up their account.
In the next video you choose the manufacturers you work with.
04 Solutions: your manufacturers and favourites
Office only proposes solutions from the manufacturers you choose. So the first thing to set up is Solutions.
Click Select manufacturers: you'll see the brands that are available for your country and your technical standards.
Pick the ones you work with and save.
Now every solution from those manufacturers is listed. Each one is a tested and certified way to seal one kind of penetration.
Its name says what it is: manufacturer, what passes through, the construction, the products and the shape of the opening. Filter on construction or installation to find what you need.
A star gives a manufacturer or a solution priority: that's how you set your preference. Click the star next to a manufacturer. Or click the star next to a single solution, for example the one your installers know best.
When more than one solution fits a clash, Office ranks them: a starred manufacturer comes first, and within that a starred solution. So a star on a manufacturer lifts all of its solutions. Filter on Preference to see your starred solutions.
The Usage column shows how often you've used a solution in your projects, and the document icon takes you to the manufacturer's own information about it.
Let's open one.
This solution seals a bundle of air-conditioning pipes. It goes in a solid wall. And the opening is round. The description is the text the manufacturer added to this solution, with the fire rating it is tested for – here up to 120 minutes.
Below are the components it's made of. You also see the countries where it's approved. On the right is the Revit object. Next to it, a 3D image of the finished seal. If an image is missing, the manufacturer hasn't made it available, so it won't appear in your report either.
In the next video you choose your manufacturers for Components too.
05 Components
Components are the products a solution is made of: sealants, foams, coated boards and collars. Choose your manufacturers here too – the list can differ from Solutions.
Each component has its code. Next to it is a short description. The globe takes you to the product page on the manufacturer's site.
Stars work the same as in Solutions: keep the products you use starred.
In the next video you start a project and see how it moves through its phases.
06 A project, its phases, and two ways to work
Open a project. Every project has a number. It has a name. And it's in a phase.
In general, the phase follows your work. In the checklist phase you check that all the information is there. In the quotation phase you set the design and the cost. In engineering, Office picks the solutions. Then come construction and maintenance. When a project is finished, you archive it. Change the phase with this button.
The tabs below hold everything about the project. The first tab, Project, gives the overview: contacts and location, recent activity, and progress on site. On the right you also see who has access.
The people and companies you work with are under Contacts: the client, the main contractor, the installer. Link them to a project, and their details are on the project page.
To start a new project, click Add a new project and fill in its number, name, company, city and date.
Now, how do the penetrations get into your project? That depends on what you have. If there's a BIM model, the clashes come from the model – that's our first demo project.
If there's no model, you work from PDF floor plans and record the penetrations on site – that's the second.
We'll start with the BIM project: in the next video, its BIM tab.
07 A BIM project: the BIM tab
The BIM tab shows the model versions saved from BIM Online, with the number of clashes and elements in each.
Click Go To BIM to open the project in BIM Online, where you load the IFC files and find the clashes.
That has a video of its own; here we continue with what comes out of it: the clashlist.
08 A BIM project: clashlists and solutions
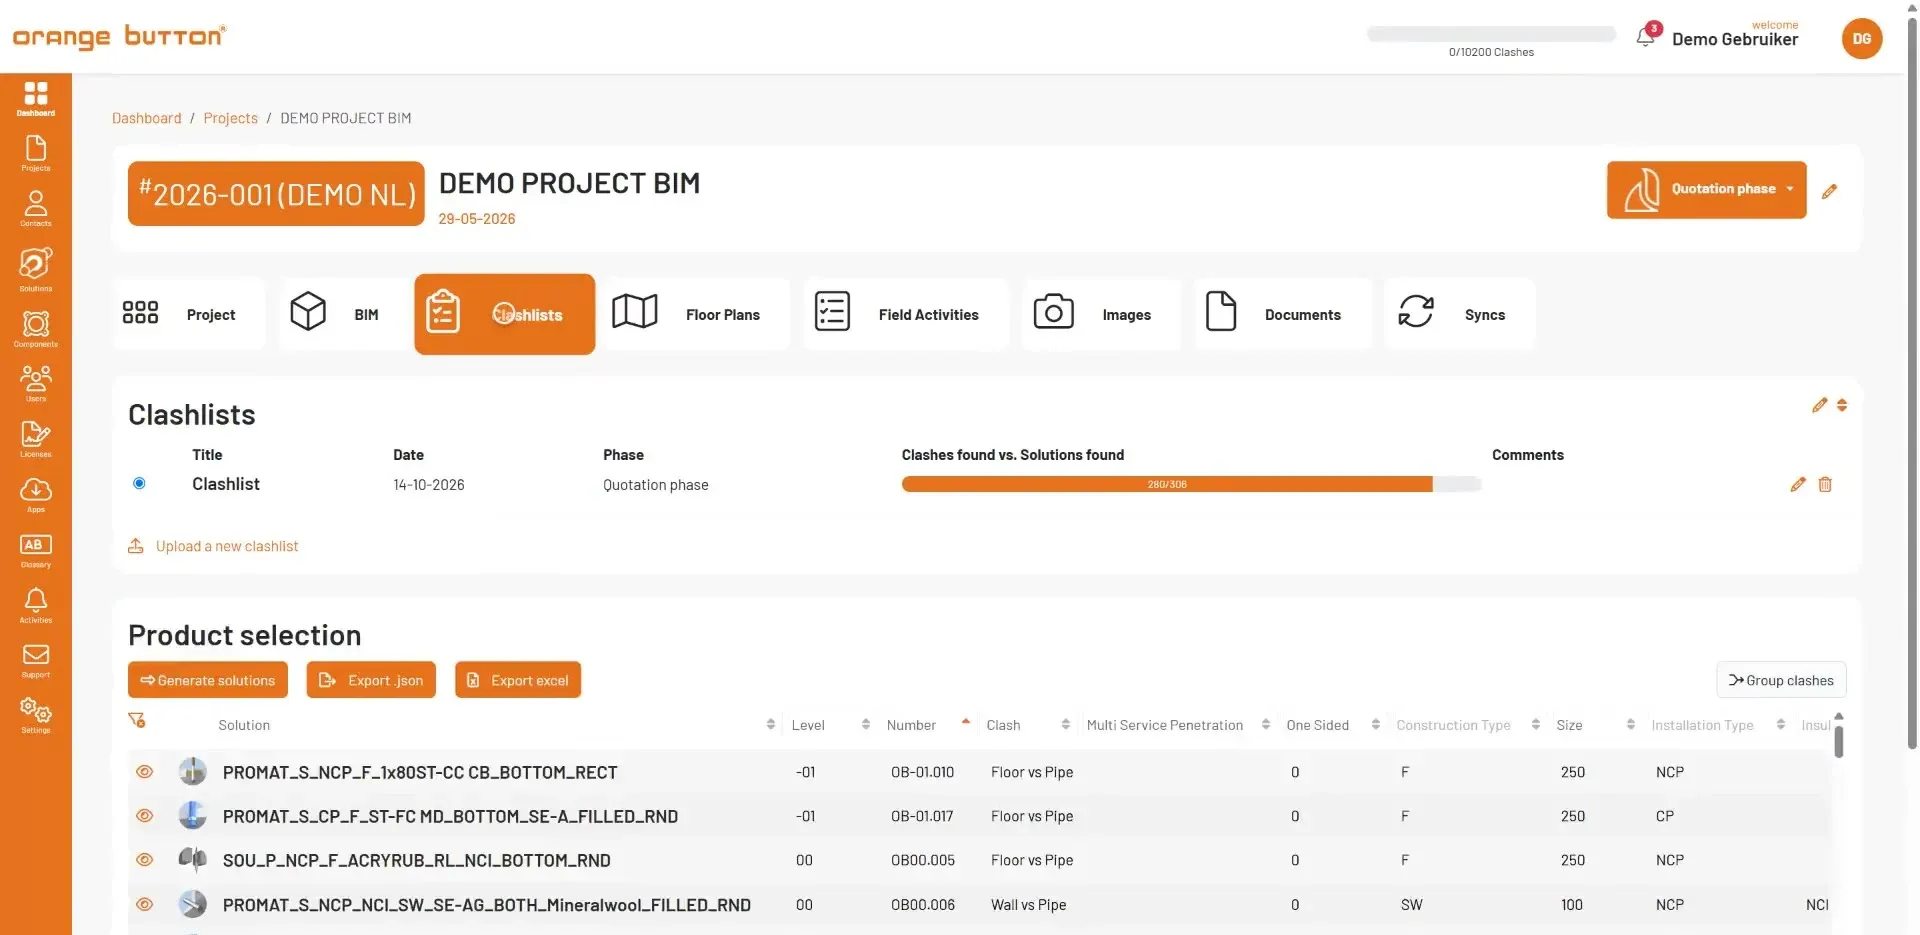
A clashlist is the list of every penetration in the project, with the information needed to seal it.
You upload it from BIM Online – or from Revit – and it appears here. The bar shows how many of the clashes already have a solution.
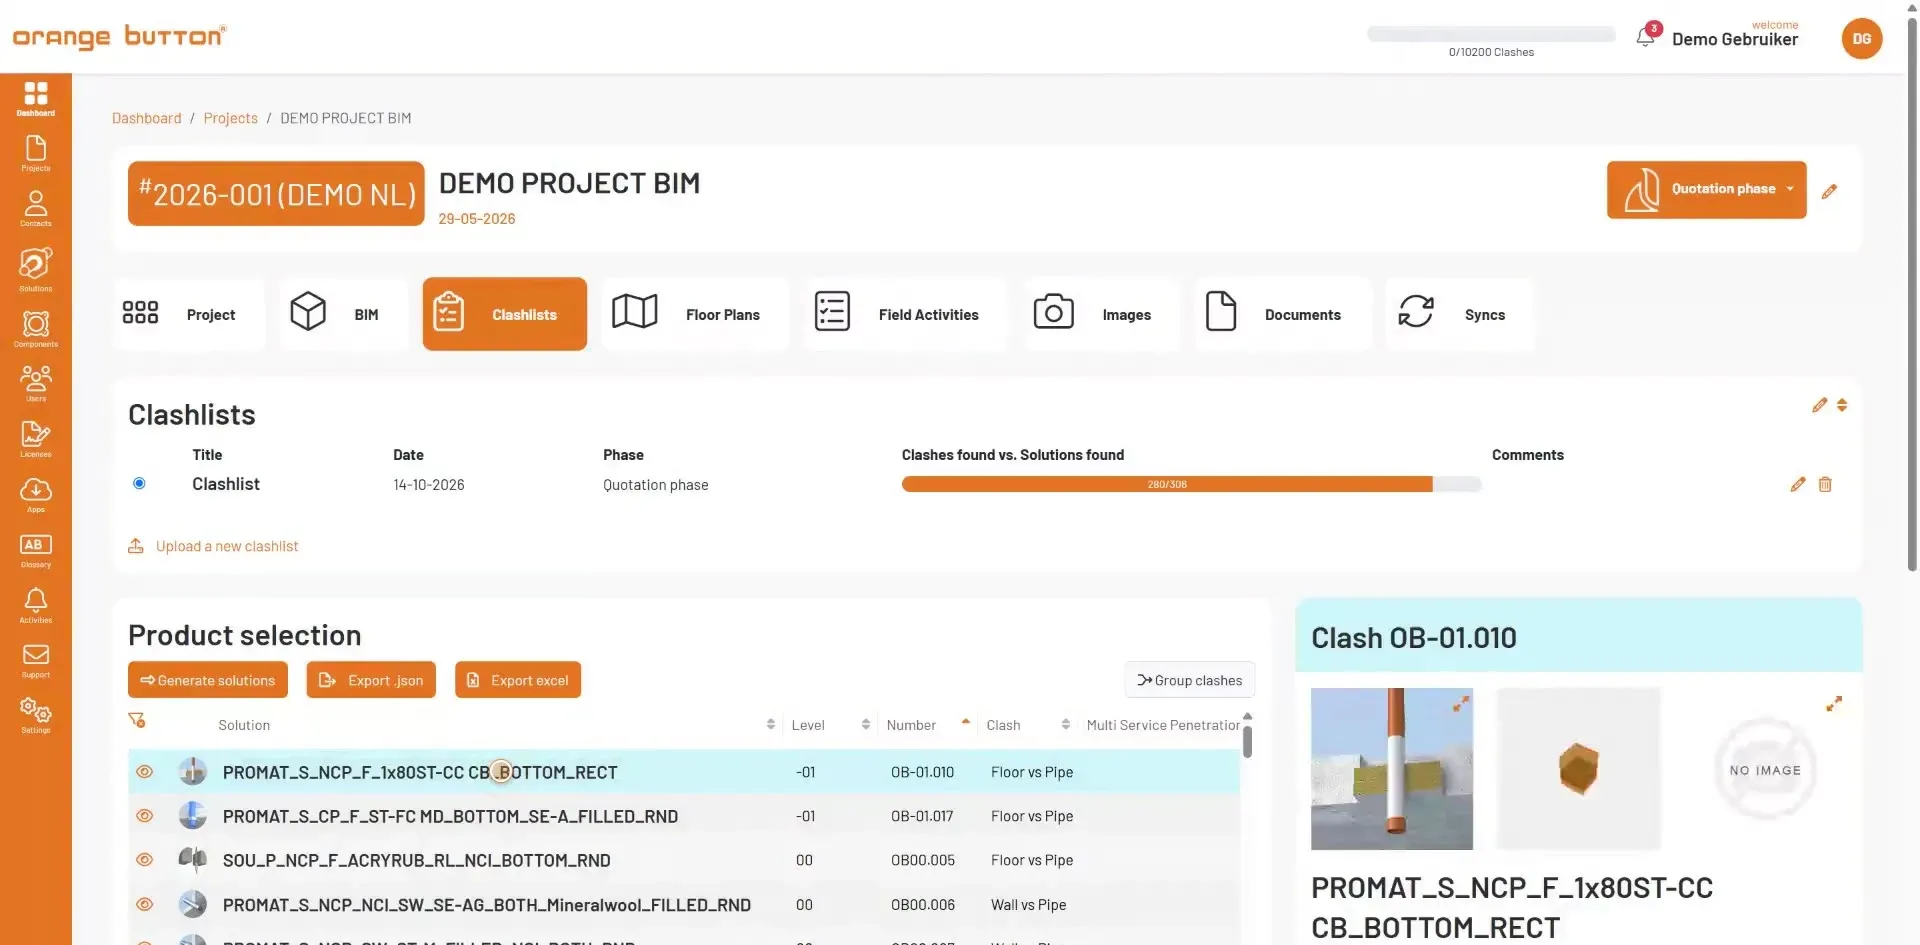
Below is the product selection. Each row is one clash: where it is, what passes through what, and the sizes. Filter any column to narrow the list.
Now for the orange button: click Generate solutions. Next, choose how Office looks for them: here, by the application areas of the solutions.
For every clash, Office looks for a solution from your manufacturers that is approved for that construction, fire rating, installation, insulation and opening, and for the sizes involved. No more searching through approvals and drawings by hand: quotations and designs are up to ten times faster. The distances that matter too – between services, to other openings and to the supports – are checked in BIM Online, under Engineering.
Click a solution to see exactly what it is. Where no solution fits, the row stays empty. Open the clash and look under Incompatible solutions: it lists the near misses and marks in red which property ruled each one out — often a single measurement.
Office proposes, you decide. Not happy with a choice? Pick another solution yourself. Clashes that are identical are grouped, so one choice covers the whole group at once.
Export the result to Excel to work with it yourself. Or export it as a file for other software.
In the next video you see the floor plans of a BIM project.
09 A BIM project: floor plans
In a BIM project the floor plans come from BIM Online, one per level, with every clash marked on it.
Drag them into the order you want. You can also download any plan as an image.
These are the plans your installers see in the Field app.
In the next video you work without a model, from PDF floor plans.
10 A traditional project: PDF floor plans
Not every project has a BIM model. In a traditional project you start from the drawings you have.
There's no clashlist here. Instead, open Floor plans. That's where you upload your PDF floor plans.
Put them in the right order. That's all Office needs: the penetrations themselves are recorded on site.
How that works with the Field app on site, you see in the next video.
11 On site with the Field app
On site, your installers use the Orange Button Field app. Before they go, they download the project, so it works without signal too.
They open a floor plan. Every marker is a penetration to seal.
Found a new one? Tap the plus and put it on the plan.
Then enter what passes through what: the construction, its fire rating, and the service.
The app proposes the solutions from your manufacturers that fit. Choose one, and confirm.
Once it's sealed, take a photo of it. Then set the status.
Back online? Press and hold the project, and tap Synchronize.
The work from site then appears in Office, under Field activities.
12 Field activities
Everything done on site comes together under Field activities – whether it started from a BIM model or from a PDF.
In a traditional project the activities are created on site; you see them here as Manual.
A basement or a stairwell rarely has reception. Work recorded without a signal stays on the phone and is uploaded as soon as it's back online, so nothing is lost.
Each activity has a status: new, scheduled, in progress, done, approved, not approved, damaged or maintenance. These are the standard statuses; you can adapt them to the way you work. Filter on status to see what still needs attention.
Open an activity to see all its details: the opening, the construction, the fire rating and the installation.
When the work is done, generate a report: proof for your client of every firestop in the building.
The report is built in the background, so you can carry on working. You get an email as soon as it's ready.
Open it from Documents. Every firestop in the building is in it: the construction, the installation, and the certified system with its products.
In the next video you keep documents with the project and share it.
13 Images, documents and sharing
Images and Documents keep everything that belongs to the project: the photos from site, drawings, and the reports you've generated.
Under Syncs you see every sync from the Field app: who worked offline, when they synchronised, and which activities were added or changed.
To work together, add colleagues under Users.
For your client or the building owner, use viewer mode. With it you create a read-only link. It shows the floor plans and the progress on site, without giving access to the rest of your project.
In the last video we look at your licences and where to find help.
14 Licences, support and outro
Click Licences in the menu. Here you see your Office licence. Above it is your clash balance. The clashes you upload come off your balance; the bar at the top shows what's left.
Under Apps you download the Field app for your installers.
Questions? Then click Support. Or watch the other videos in this series.
That's Orange Button Office: with a model or without, from penetration to solution to an approved firestop on site. Because every building is built twice: first in BIM, then for real. Thanks for watching.
Everything in Office
- 01
Dashboard
Your projects per phase, today’s activity, your preferred solutions and how much of your licence you’ve used.
- 02
Solutions and components
Choose your manufacturers for your country and technical standards. Star a manufacturer or a solution to set your preference; each solution comes with its components, Revit object and 3D image.
- 03
Projects and phases
Every project moves from checklist and quotation to engineering, construction and maintenance, with its contacts and who has access.
- 04
Clashlists and solutions
Generate solutions for a whole clashlist in one click: matched on construction, fire rating, installation, insulation, opening and sizes. Identical clashes are grouped, and you can export to Excel.
- 05
Floor plans
One plan per level from BIM Online, with every clash marked, or your own PDF floor plans for a project without a model.
- 06
Field activities and reports
Everything done on site comes together with its status, from new to approved. Generate a report with every firestop in the building.
- 07
Images, documents and syncs
Site photos, drawings and reports kept with the project, and a log of every sync from the Field app.
- 08
Company, users and sharing
Invite your colleagues, protect accounts with 2FA, set the language of your reports, and share a read-only viewer link.
Questions
Where does the clash list come from?
From Orange Button BIM: BIM Online or the Revit Edition. No BIM model? Then you don’t need a clash list: upload your PDF floor plans in Office, and your installers record every penetration on site with the Field app.
Can I use Office without a BIM model?
Yes. Create a project, upload your PDF floor plans and put them in order. The penetrations are recorded on site in the Field app, which proposes the solutions from your manufacturers. Everything comes together in Office, up to the report with every firestop.
Which manufacturers are available?
Office includes the manufacturers that have joined the platform. Missing your favourite? Let us know and we will get in touch with them.
Can I work with my whole team?
Yes. The Office License is per user, so you can invite everyone who works on your projects.