

OB Manufacturer Implementation time
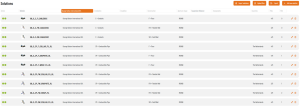
OB MANUFACTURER IMPLEMENTATION TIME Orange Button is making significant progress in connecting manufacturers and end-users within the passive fire industry. Since our platform is designed to compare every firestop solution, the implementation of a specific manufacturer’s products requires a tailored approach. Let’s begin with what our platform Needs. Solution List
Golden Thread Fire Delay (UK) joins Orange Button!
Exciting news, Golden Thread Fire Delay from the UK joins Orange Button! 🔶 Welcome to the Orange Button Family, Golden Thread Fire Delay! We’re excited to welcome Golden Thread Fire Delay, a passive fire protection specialist, to the Orange Button Family. Since 1994, they have been supporting clients to implement

AF Systems (IT) joins Orange Button!
Exciting news, AF Systems from Italy joins Orange Button! 🔶 Welcome to the Orange Button Family, AF Systems! 🇮🇹 We’re excited to welcome AF Systems, a leading Italian specialist in passive fire protection, to the Orange Button Family! Renowned for their technical expertise and commitment to innovation, AF Systems has